 The Compass DeRose Guide to Ethernet computer network wiringThe Compass DeRose Guide to Ethernet computer network wiring
This page gives you all the information you need to know about how to install and wire up a small CAT5, CAT5e, or CAT6 ethernet computer network, such as in your home or a small office; or to make your own Ethernet cables. I wrote this page to make network wiring easier after I dug up the information the hard way in order to wire my own house.
If you just need to know which color goes on which pin, there's a special section.
This document was written by Steven J. DeRose around 1998, and was last updated Auguest 11, 2009.
There are several basic types of networks appropriate for connecting computers, printers, and other devices in a small area such as a home or small office building:
Twisted-pair Ethernets: These run on wire that looks much like telephone wire, and are appropriate for any number of devices within about 100 meters/325 feet. These comes in grades such as CAT-3, CAT-5, CAT-5e, CAT-6, and are also named by speed: 10base-T, 100base-T, 1000base-T. This web site tells you how to set up twisted pair Ethernets.
Coax-cable Ethernets: These use wire that is more like cable-TV cable (but the cables are not interchangeable). These have a longer range, about 185 meters, but are harder to install, and require special adapters to connect to current computers.
Fiber-optic networks: Fiber supports very high data rates and longer distances (up to a few kilometers), but is much more expensive and touchier to work with. I don't recommend trying fiber without special training.
Wireless networks: These are very popular, and can't be beat for convenience. Within about 150 feet no wires are needed (newer WiFi, such as types "g" and "n", can go further). On the other hand, range and reliability vary with wall materials, humidity, etc; and security is poor. There are several variations: IEEE 802.11a (rare), 802.11b (very common), 802.11g (backward compatible with 802.11b), and 802.11n (very new, longer range and higher speed). You need a special card for each machine, for about $30, and a base station or "wireless access point" for about $80.
For a home or small office, twisted pair is the best choice for reliability, speed, and security, and wireless is the best choice for convenience. Wireless will be cheaper than putting connections ("drops") in every room, but more expensive than just a couple drops, such as in an office and bedroom. If you have a laptop, wireless is handy because you can use it in many airports, hotels, and even Starbucks, via TMobile or other services.
I get many questions about how to wire very long connections, or connections outside. For those situations, or for connecting between different network types, see this section.
Twisted pair Ethernets carry from 10 million bits (not bytes) per second (10Mbps) to 1 billion (1000Mbps or 1Gbps). For home use 100Mbps is typically plenty, especially because the connection out to the Internet is generally far slower than that. To get a certain speed, every part of the path involved must support it: the type of wire and connectors, workmanship of wiring, Ethernet card, and hub. If you already have CAT-3 telephone wire running to some places, you should be able to get 10Mbps of data through it, which isn't bad. CAT-5 parts and workmanship can support 100Mbps. CAT-5e or CAT-6 parts and workmanship can support 1000Mbps. CAT-7 is not yet widely used, but will support 10Gbps.
Fortunately, high-speed parts also work fine at lower speeds: If you set up a CAT-5 network and plug in a machine whose Ethernet card only supports 10MBps, that's generally ok. Most new hubs and cards can switch automatically between 10 and 100 Mbps as needed.
Top-rated wire costs very little extra. The bulk of the cost or effort is in pulling wiring into place through walls. Because of this it makes little sense to use less that CAT5e wire. Other parts such as sockets also cost only a little more.
A key thing to remember is that a twisted-pair network must be arranged in a "star". That is, every device must have a separate wire back to a central point, where a device called a "hub" or "router" (under $50) passes data from one wire to another. You cannot just hook the wires from multiple devices together and have it work -- unless you have only two devices total, and a special "crossover" cable (see below).
Newer phone wiring (say, from the 1990s on) is usually 3-pair (that is, 6-conductor) wire rated "CAT3", with the blue/blue-white pair used for the primary phone line. The two other pairs should be able to handle Ethernet up to 10M bits/second. You can try wiring those two other pairs to an Ethernet connector as shown below and see, but it's unlikely to work. This is because house phone wiring is seldom set up as a star. Instead, builders usually hop from each room to the next with one long wire (to get them to do a star, order "home runs" for all sockets). Typically you'll have to install new wire instead.
Wiring can be done outdoors or underground, but is unusual. If you need to do that, see this section.
Hiring wiring done may cost $100 to $350 per connection. If you pay to have it done, make sure your contract requires the contractor to test and certify every line for the quality you are buying. Not all electricians, carpenters, phone installers, or handypeople know how to do it right. If you're considering a big job, you may want to consider my notes on how to save on drops.
This page, all by itself, should give you enough basic information to succeed. However, don't try this if you're not fairly mechanical, or adept at similar tasks. Network wiring, especially for speeds over 10Mbps, is touchy, and it's easy to make bad connections (or worse, wiring that almost or usually works, but fails under stress such as high data rates). Diagnosing such problems can be hard, even with expensive test equipment.
I don't discuss here how to drill and fish wires through walls, how to mount a box, etc. This is all the same as for any other kind of wiring, and you can learn it from tons of books available in your local book or hardware store, Amazon, etc. But you'll do more of it than for just adding a new electrical outlet, since for network cabling you can't just shortcut to the nearest one. On the other hand, you can use "low voltage" boxes that have no back, which might be a little easier. Companies like CableOrganizer also sell a variety of plastic moldings that you can stick to the wall and run wires through; these can be very nice (but think hard about how you're going to get past doorways).
Warning: Wiring of any kind is potentially dangerous. Apart from the usual dangers of sharp tools, you can encounter electrical wires, pipes, etc. when drilling through walls, or encounter other potentially dangerous conditions. If you aren't sure you know what you're doing, don't take the risk, just hire a professional (that will also be less stressful, because something unexpected always goes wrong!). I'm not responsible if you get hurt.
Although I've tried hard to get this all right, it is entirely possible I've made mistakes here, or that your circumstances may require special materials or procedures beyond the simple cases I describe. I can't advise you on that, and it is your responsibility to ensure that any work you do is safe and legal. I am not a professional sysadmin, electrician, network-builder, etc.; I do software, develop markup language standards (like XML), study linguistics, and do other things involving information not electrons. This page is here to be helpful, but you use it at your own risk.
Since you're still reading, here's what's included in the rest of this document:
If you're doing CAT5 or higher wiring, make sure of the rating for every part you use. The various grades of parts look about the same, but aren't. Any given branch of your network will only work at the speed of the worst-rated part it contains.
The wire. Just buy a 1000-foot reel and do a random act of kindness by giving someone the leftover or helping them wire their house. For a very small installation (say, under 4 drops), you could just buy patch cables with plugs already attached. However, it costs much more; patch cables are usually made with stranded wire that has worse performance; and it can be a real pain getting wires through holes with their plugs intact. Still, for very simple installations you could just run patch cables, plug in, and be done with it (make sure they can't be stepped on).
Appropriately rated 'RJ45' sockets for the equipment end of your wires
Appropriately rated modular plugs for the hub end of your wires
An Ethernet hub to plug all those plugs into
Don't forget Ethernet cards for any of your devices that don't have them already. Most new computers have them off-the-shelf, but many printers can't do Ethernet at all without a special print-server device in between. You'll also need short Ethernet patch cables to go from outlets to devices.
For big projects, you may want a "patch panel" at the hub end where all your wires come together. I wouldn't bother, since (a) wiring a plug is not much harder than wiring a panel; (b) you would then need to buy patch cables to go from the panel to the hub; and (c) this method adds parts and connections, and so lowers reliability. If you do want to do it this way, you'll need a few extra tools and techniques I'm not going into here other than brief mention below.
Very similar materials and techniques also apply to phone wiring, so you can use this Guide to help with that, too. Phone wiring can be a lot sloppier and still work, and CAT3 wire is just fine for it (though if you bought a roll of CAT5 or better, you might as well use it for everything). If (like many) you are tempted to use the "extra" wire in Ethernet cable for telephone lines, see Relation to phone wiring below. It often works fine, but there are no guarantees, and it complicates managing the wires at both ends.
Ethernet wire has 8 wires in it, usually solid 24-gauge copper. The wires are divided into 4 pairs, and each pair is twisted tightly together. It may look a lot like any old phone wire, but it's not. Details like the twists are what make the stuff work. If you look closely, you'll notice that each of the 4 pairs has a different number of twists per inch -- the exact number is not as critical as the fact that they're different. The entire cable is designed to associate the 2 wires in any pair very closely, and to dissociate them from the other pairs.
So make sure the cable says CAT5 or better (see labeling). If it doesn't say it, the manufacturer didn't do it. CAT3 wire can handle a 10Mbps net, but nowadays don't bother installing anything less than CAT5e wire, and preferably CAT6. With CAT6 or CAT6+, you can go to 1000Mbps or even higher (however, CAT6+ requires different connectors on the ends). CAT7 gets trickier because each pair is separately shielded.
Cable comes shielded ("STP") and unshielded ("UTP", shown at right). Unshielded 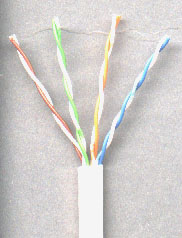 is fine for most applications. Shielded is harder to work with, since you need to ground the shield at one end, using more expensive and complicated metal connectors.
The outer casing comes in normal (vinyl, PVC, etc.) which is just fine for most residential use, or the much more expensive "plenum" kind (teflon?) which is needed if you're running the wire in heating system plenums or certain commercial settings. Check your local fire and electrical codes to be sure. Non-plenum CAT5e wire goes for about $70 per reel; CAT6 for about $120. Many hardware stores stock it at ok prices.
There are bundled cables that combine Ethernet, cable TV, and phone wires, for example from SmartHome. The plus is that it's significantly easier to pull everything at once: less tangling, fewer boxes and spools to manage, etc. The downsides include price (from $600 to $1000 per 1000 feet, depending mostly on whether fiber optic cables are included), lower flexibility (physical and in terms of your cable planning), and the fact that you'd have to be very well organized at the place where all the cables come together to hook to Ethernet hubs, video splitters, phone patch panels, and so on (they'll sell you "distribution panels" to help with this).
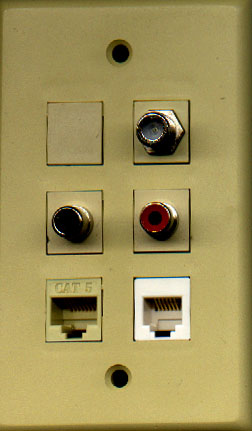 You can get sockets in a variety of forms (much like phone sockets), even at Radio Shack and Home Depot. Surface-mount blocks cost about $6. If you're using in-wall boxes, you can get CAT5 sockets on whole wall plates for about $4. I much prefer modular plates and inserts as shown at right, because you can use them for Ethernet, phone, video, audio, etc. at the same time.
Modular plates are about $1.50 and you can get them with 1, 2, 3, 4, or 6 holes (also double-width plates with 12 holes). A wide variety of "inserts" are available: CAT6 ones are about $4.50, CAT5 about $4 (see picture); phone ones $3, and so on. Get plates with more holes than you need now, and buy a lot of extra blank inserts ($0.20 or so) to fill extra holes until you discover what you need them for (audio, video, security, etc.). You can buy inserts with a wide variety of connectors already mounted, or drill holes in blanks and mount your own connecters. For example, behind my stereo I have speaker connections on a plate with off-the-shelf binding posts screwed into blank modular inserts.
Note: There are several manufacturers of modular plates and inserts, and inserts from one may not perfectly fit plates from another. They are usually close enough to work with a little persuasion.
Leviton makes a nice line, called "Quickport", including my favorite: "insert plates" that hold the inserts, but then can be covered with any "Decora" cover plate so they match your other plates (see below). One snag with these is that only Leviton's RJ45 inserts seem to be narrow enough to fit side-by-side on the 4- and 6-hole plates. No such problem with plates having 3 or fewer holes. They may be hard to find, but HomeTech has them here, and Cable Organizer has them here.
In some places it would be nice to have a wall plate with a short cable built in, that you could just pull out for a few feet when needed. It took me a long time to find this, but you can get them at Teleadapt. They also have desktop gadgets that contain a retractable ethernet cable (and some have a power outlet, too).

These look just like phone plugs, only wider. (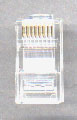 Make sure you get the right crimping tool for whatever plugs you get. Some manufacturers make slightly different plugs for solid vs. stranded wire, and for shielded vs. unshielded. As far as I can tell, they all work fine, and I haven't been able to determine if there's any difference between CAT5, 5e, and 6 plugs. Plugs are cheap, about $0.20.
With a little searching, you should be able to find a kind of plug with one extra nice feature: the holes for the wires go all the way through. With these, you can strip a bunch of extra wire, pull it all through, and easily verify that you've got the wires in the right order. They cost more like $0.65 each, but are probably worth it. I've seen them advertised as the "EZ-RJ45™" connector. One source is here.
If you want to be fancy, you can buy little rubber "boots" to cover where the wires go into the plugs, in various colors for about $0.30. I seldom bother, though they do help prevent breaking off the little plastic latch. The latches do tend to catch on everything in sight, so if you will be moving cables around much, the boots are worth it.
For simple nets you won't need a filtering bridge or router, just a plain unfiltering hub (though if you've got a DSL or cable modem connection, you may want one as a firewall). In large nets routers are crucial so that heavy internal traffic in one group doesn't slow down people in other groups. Hubs can be added most anywhere, and are a great way to save on extra wiring.
Hubs are available cheaply from most any computer seller. Get more ports than you need now. Hubs can be 10Megabit per second, 100, or 1000; or able to auto-adjust; I use a 24-port 10/100 hub I got on eBay for $50. Routers have dropped greatly in price; they can provide load-balancing and firewall features that hubs don't. I've had good experiences with LinkSys router/firewall boxes.
A friend (Richard Ristow) once gave me a bit of advice on tool-buying that I recommend to you: "Buy the cheapest tool that is clearly better than what you need." For this work you'll need:
A modular plug crimping tool. Phone ones won't do it.
A cable tester. A cheap one is ok, but don't skip this completely. Wire an Ethernet plug to some alligator clips and you can use the tester for lots of other things too (but don't try it on live power circuits!). I use a Progressive Electronics tester, about $75. Slightly better is the Paladin Lan Pro Navigator at about $100. If you step up to about $275-350 you can get a tester that can also detect split pairs, measure wire length, ping hubs, verify data sent on the wire, and so on. Model names and numbers change constantly, so comparison shop.
An inductive tone tracer (about $50) is also a really good investment: you clip the tester on one end of a wire, and the tracer lets you follow the wire even hidden behind walls, or obscured in bundles.
Cable-labelling tape. 3M's Write-On Tape System is nice though a little pricey at $23.50. It has the advantage that half of each label is clear, so as you wrap it onto the wire, the clear part covers and protects the written-on part underneath.
A punchdown tool (probably comes free with the sockets).
Typical stuff like screwdrivers, wire cutters, pliers, sledgehammers, etc.
If you're running wires between floors, try the very long, flexible drill bits, such as from Ideal Industries, or Altex. They're perfect for reaching through the hole you make to put in a box, and then bending to drill straight through the sole plate. They also have a hole in the tip so you can tie on a wire and pull it back up. You may be able to find similar bits at local hardware outlets, but be sure to get the auger type (with a screw point that pulls the bit ahead) -- I've found the others almost useless, but with my first auger-tipped one it went so fast I had drilled about 8" down into a vertical stud below the sole plate before I realized there was a problem (lucky me to pick exactly that spot to drill).
If you're extravagant about tools, 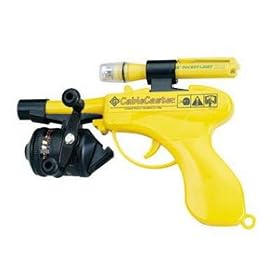 and likely to run lots of wire above suspended ceilings or through crawl-spaces, Jensen supplies the Greenlee "CableCaster™", a great toy I bought that you'll want too. It's a dart gun with a fly-casting reel: you shoot the dart and it carries a line with it; attach the wire to the end and reel the dart back. It has a mounting for a flashlight on top, but you really should use a laser pointer and quote Arnold Schwarzenegger.
Safety glasses, dust mask, gloves, and other safety equipment as appropriate. Easy to skip; I did once and ended up with a dozen trips to the eye doctor.
Oh, one last detail: if you're using a typical wooden folding ladder, take a minute to tighten all the bolts going across under the steps. It will make the ladder a lot safer and steadier.
I have no relationship to these companies, except as a satisfied customer.
Altex Electronics. 11342 IH-35 North, San Antonio TX 78233-5792. Phone 800-531-5369. Carries a huge selection of cable and parts, and some tools, with excellent prices and service.
Jensen Tools. 7815 S. 46th St., Phoenix AZ 85044-5399. Phone 800-426-1194. Carries individual tools and well-organized kits, plus some materials. Ask for their "Communications Products Resource Guide".
MilesTek. 1506 Interstate 35W, Denton TX 76207-2402. Phone 800-524-7444. Carries a wide variety of cabling equipment and parts, for data, telephone, audio, video, etc. Catalog available from the website. One item I've only found here is a punch-down block designed for distributing a small number of lines to many extensions each, instead of the usual setup for many lines to one extension each (item 50-44032).
If you're around DC, check out Capitol Cabling and Technology at 7905 Airpark Road, Gaithersburg, MD 20879, phone 1-800-899-9059. Excellent selection and service, and astounding cable prices. They have a website, but apparently no online sales.
Radio Shack and Home Depot carry a decent selection of basic parts as well.
First pick a location for your hub, preferably centered to keep cable runs shorter. A basement wall not too close to your electrical panel is fine, or a wall in a closet. If you are doing a lot of connection points, it may save you some wire pulling if you use a separate hub for each floor: weigh your time and the cost of wire, versus the cost of an extra hub(s) and the pain of having to go look at status lights in more than one place when something goes wrong. You probably don't want to put a hub in an attic or crawl space, for lots of reasons.
Map out your wiring plan and decide how many wires go to each place. You may want to pull cable TV, phone, audio, intercom, etc. at the same time. If I'm going to go to much trouble, like fishing wires from basement to attic to wire a second floor, I pull more wires than I need and also leave a string in to pull more later (this also means you drill larger holes). Wire is far cheaper than labor. You may want to install flexible conduit ("blue pipe") or wire-molding if you anticipate adding wires later.
Figure out how you will get a wire(s) from each place you want a connection, to the hub location. This may involve painful vertical runs, slogging through attics full of fiberglass (don't skip the mask!), drilling through walls and sole plates, etc. If you've got more than one floor, consider putting plates directly above each other to save on vertical drilling.
Warning: any time you drill between floors you are giving fire (and cold air, and insects,...) a place to get through too. Check whether local fire codes require you to seal such holes in some special way. Even if they don't, you might want to anyway. Some special fire-resistant caulk and foam products are available here. 3M Fire Barrier Caulk, Dow Corning Fire Stop Sealant, and Standard Oil Fyre Putty are other products usable for such purposes.
Plan wire placements to avoid anything that puts out much of a magnetic field. Stay at least 6" from electrical wires if running parallel to them, and stay well away from flourescent lights.
Make a materials list and then order materials. Plan to leave a couple extra feet at each end of each wire run. Buy at least 10% more of everything (especially wire) than you think you'll need.
Choose whether you are going to use "T568A" or "T568B" wiring (see below for the details). It doesn't matter which you choose, but be consistent or you'll confuse yourself later. I've heard varying stories on which is officially "preferred" when; but B seems more common. Most sockets I've seen are clearly marked for both A and B.
Geek note: These standard wiring arrangements are defined by the American National Standards Institute (ANSI), the Telecommunications Industry Association (TIA), and the Electronics Industry Alliance (EIA). You can buy the specifications themselves from TIA here.
Start getting wires in place. Use most anything but staples to support long runs and to ensure gradual rather than sharp curves (the key thing is not to crush or crimp the wire). Do not pull hard on the wire, stomp it, crimp it, bend, fold, spindle, or otherwise mutilate. You can easily make the wire no good for 100MB (not to mention 1GB), even with no visible sign of damage. If you puncture or badly crimp a wire, just replace the run; don't even think about splicing. Start with the longest runs first: that way if you do damage a wire, you have a better chance of cutting out the damage and having enough to be useful for a short run (or two) later. This is also a reason to pull an extra wire along, especially on long or difficult runs. Having two boxes of wire makes this much easier.
Don't forget to label each cable at the hub end as soon as you pull it in -- if you wait, you'll probably have a painful sorting job later (for which you would be wise to buy the inductive tone tracer I mentioned earlier). Writing room names is good, but I've recently started using color-coding too, because it's much easier to scan a bunch of wires for bands of color than to read fine print on each wire. Just put 2 bands of color on each wire, in the same order at each end. Colored vinyl tape works fine; I prefer enamel paint-pens from the local craft or hobby store. I also mark the same colors right on the RJ45 sockets.
You could also use cable and/or boot color to distinguish wires. Cable Supermarket has a wide selection of colors (10 as of this writing). StoneWall Cable sells pre-made cables in multiple colors, with serial numbers printed for you at no extra charge.
The resistor color code seems the right one to use for organizing your cables: Black=0, Brown=1, Red=2, Orange=3, Yellow=4, Green=5, Blue=6, Purple=7, Grey=8, White=9.
Note: I strongly recommend marking all crossover cables (see below) with a wide band of red at each end, or using red-jacketed wire; and not using red for anything but crossover cables.
Put a socket on the equipment end, and a plug on the hub end of each cable as described next. I prefer to finish each cable and test it before going on to the next.
Install sockets at the device ends (typically wall-plates all over). Don't strip the wires. Remove only as much outer cover as you need to do the connections (see picture).
Hint: If you're new to this, practice on scrap cable until you can cut the outer insulation without nicking the inner insulation. The best bet is to cut only partway through, and pull to snap the last little layer. Most wire has nylon threads included for strength, you can just trim them off.
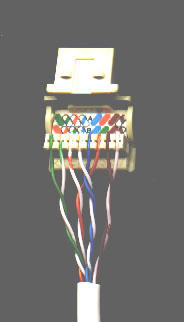 Sort the wire ends into the right order for the socket. Untwist each pair just enough to get the wires placed neatly into the right slots, and never over 1/2 inch (the twists are so critical that sockets have hidden twists inside -- which is why the wires don't connect to the sockets in the obvious order you might expect). Depending on the particular socket, you may be cutting the wires to slightly different lengths. Don't let copper hang beyond the ends, it can easily bend and short out the cable.
Hint: If your sockets (unlike the one shown) have a channel down the middle, with half the punch-down slots on each side, then bring the main cable down the middle, with the wires bending toward the outside.
For each wire, align it over the correct slot and punch it down to the bottom of the slot with a punchdown tool. I find it easiest to punch each wire into its slot with a fingernail, so it holds better while you're trying to align the punch-down tool. Some sockets have a cover that you can put on afterwards; it's not critical, though it's neater and slightly more secure.
Double-check which wire is in which slot (particularly, make sure you're consistent about T568A versus B).
Plugs are a little touchier. Remove the outer cover about 1/2 inch. There will need to be intact outer insulation under the strain relief once the wires are seated. The strain relief is a bit of plastic near the back of the plug that gets crimped down at the same time as the connector pins do (practice on scrap the first time). After removing the outer cover and any hanging nylon threads, sort the wire ends into the right order for the plug. Again be sure to be consistent about whether you're using T568A or B. Untwist each pair just enough to get the wire ends all even and in the right order. Never untwist for over 1/2 inch.
I strip a little more than I need, untwist, straighten each wire, then sort the wires into the right order. Squeezing the sorted wires between your fingers, and twisting very slightly from side to side, will help them sit neatly side-by-side. During this process, wires will often creep out of order, so double-check. Then trim them off evenly to the right length. Don't let copper hang beyond the ends. Diagonal cutters are the right tool for this, but the wire is thin enough that swiss army knife scissors will work fine. Right after trimming, use one hand to hold them straight (I keep this hand there from the beginning of the twisting), check the color order again, and use the other hand to slip the plug on. Look into the plug (normally transparent plastic), and check:
Then put the crimp tool on and squeeze.  See the picture at right, but note that this picture shows much more stripped than you want, so that you can see the colors clearly. In reality, make sure the outer insulation extends into the plug, so it catches under the strain-relief when you crimp.
Hint: Remember to test the cable. But understand that inexpensive testers don't test thoroughly. They don't stress-test cables at high bit rates, and most can't detect a "split pair" (for example if you switched the orange/white with the blue/white wire, which definitely won't work). If you're doing only a little of this, it's probably not worth buying a higher end tester than that. Just resign yourself to the possibility of troubleshooting or replacing a wire or two later.
If you're running only 10Mbps on CAT5 wiring, you'll likely be just fine even with a few mistakes, such as slight kinks, periodic sags, or a little too much untwisting at some ends. But since most Ethernet devices are now 100Mbps it would be a shame to lose 90% of the speed for being sloppy. If you want to go to even higher speeds eventually and are pulling CAT5e or CAT6 wire, be extremely careful about all these rules. Be especially zealous about minimizing the untwisting you do at connections.
Once you have all your cabling done, plug into the hub or router and go. Then comes the really arcane art of setting up your servers, DNS, etc., about which this document will tell you almost nothing. Sorry. There is some information on how to configure some systems here. On Macs, just turn on File Sharing and AppleTalk and you should be fine.
Never pull CAT5 or higher wire with more than 25 pounds of force.
Never step on or otherwise crush, kink, or crimp the wire (don't staple or use tight wire ties or clips).
Never put a staple, nail, etc. through the wire (you knew that, I'll bet). In fact, don't even allow the cable to see pointy objects, or it may get scared and stop working just out of spite.
Avoid periodic sags; if the cable must sag, vary the intervals. This is especially critical with CAT5e and CAT6, so use j-hooks, loose velcro wire-ties, or other things to manage the wire. In commercial settings the electrical code probably prohibits just laying the wire on top of a suspended ceiling.
Never bend CAT5 or higher wire tightly around a corner; make sure it bends gradually, so that a whole circle would be at least 2" across. Watch especially when the wire comes out a drilled hole and turns; don't let knots or kinks happen even temporarily.
Don't put so many wires in any conduit that it ends up more than 40% full. Never do more than 180 degrees of conduit bends without putting in a "pull elbow" (an elbow with a plate you can open), or your chances of pulling wires through are poor.
Never untwist the 2 wires in a single pair for more than 1/3-1/2" to make a connection (the twists are critical to cancel out interference between the wires).
Avoid running the wire parallel to power wiring nearer than 6" away (the longer the wires run parallel, the further away you want them). Also stay well clear of flourescent lights. I ran some of my network wiring right alongside intercom wiring (since I'd pulled them into place together). One day I was using the tone tracer to locate a wire, and heard music through the tone tracer, because it was being played through the intercom system and coupled right across into the Ethernet wires. Didn't seem to hurt anything, but it made me take the rules about parallel runs more seriously.
No run (hub to device) may be over 100 meters long (if you had a 100-meter long house, you'd be hiring this done anyway!). The limit in practice could be a little higher or a lot lower depending on quality of wire and workmanship.
Try to run the wire where it is unlikely to be drilled, nailed, kinked, stepped on, or otherwise damaged by later tradespeople, picture-hangers, or anyone else.
Geek note: The reason for all this hoo-hah about twisting is that CAT5 signals are "balanced": the striped and solid wires in a pair carry the same information negated, so their electromagnetic fields tend to cancel each other out. This makes them interfere less with other pairs. Balanced wiring can also use about half as much power in each wire (since you get two copies of the signal); that reduces the field even further. Untwisting de-couples the pair, and it then radiates an awful lot more energy, thus potentially interfering with other pairs.
CAT5 and higher connectors look just like telephone connectors, only slightly wider, to allow 8 wires instead of 6. You can physically plug a 6-pin plug into an 8-pin socket, but it may damage pins 1 and 8 of the socket (I personally haven't seen that happen). Cat5 and CAT5e Ethernet only use 4 wires, but running 8 will save enormous time the first time a wire fails: you can just switch to another pair.
Since there are extra wires, you can try splitting them out into two sets of 4, and put 2 Ethernet connectors at the end of any wire. There are handy adapters for this, similar to a one-to-two phone line adaptor. If you have trouble finding them, you can make one with a plug and two sockets. The wiring pattern for this is shown here. You can similarly use the other pairs for phone lines, as discussed below.
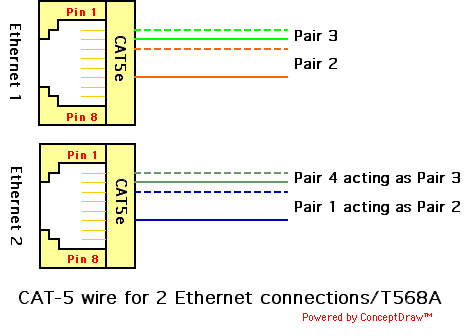
The formal CAT5 definition reserves the extra 4 wires, so neither kind of cable-sharing is technically allowed. However, several people have reported successfully doing it, and none have so far told me it has failed. See Relation to phone wiring, below. But CAT6 wiring does use all 8 wires, so if you share cable in this way you won't be able to upgrade to actual CAT6 speed -- then again, it may be a while before you really need 1 billion bit per second networks running in your house.
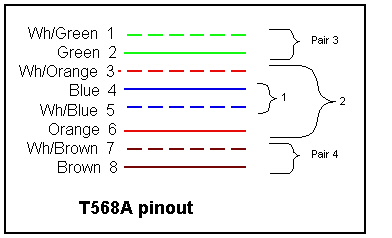 There are two wiring options, called T568A and T568B ("USOC" is for something else and won't work). Use either one but stay consistent. Every individual cable must be consistent (both ends the same) or it won't work; all cables in your installation should be consistent, or you'll get confused. You can use patch cables of either kind, they'll interoperate just fine. T568A looks like this (will add T568B picture once I get around to drawing it):
Or, in prose (and for accessibility), from pin 1 to 8 we have green/white, green, orange/white, blue, blue/white, orange, brown/white, brown. See also the wires in an actual plug.
Pair 1 is the blue pair, 2 is orange, 3 is green, and four is brown. So far as I know Ethernet protocols can't photo-detect the insulation color, but don't mess with it anyway. Certain changes will work, but most will not. In particular, if you separate the two wires of a single pair, you're toast.
Only pair 3 (green, on pins 1 and 2), and pair 2 (orange, on pins 3 and 6) are actually used. So you can botch the other pairs and not get in trouble... until you want to use them later.
Note: Old 10-base-t (CAT3) Ethernet specs called the green and orange pairs 1 and 2, apparently expecting you wouldn't have any other pairs around. But pair 1 in CAT5 is the blue pair in the center, which is not used. The blue pair in phone wire is for the primary telephone line, and goes on the same (center) pins. Not using it in the Ethernet spec makes it less likely that a telephone pair will get patched to an Ethernet pair (where the ringer voltage would probably cause trouble). It also means you could wire the blue pair to the phone line, and use the very same socket to plug in either phone or Ethernet at different times. However, this seems a bit silly when you could just run the blue pair to an adjacent phone socket instead. Might be a good design idea on laptops, though.
Be very sure you count the pins in the right order. Most connectors are color-coded directly for T568A and T568B; the connections are seldom in the obvious order. If you get things backward they won't work. You cannot swap wires across pairs (for example, to treat green and orange/white as a pair).
To determine where pin 1 is:
If you're looking into a socket with the latch downward, pin 1 is on your left.
If you're behind the socket with the latch downward, pin 1 is on the right (though the connection for pin 1 may not be).
If you're looking at the contact end of a plug with the latch down, pin 1 is on the right.
If you're looking at the wiring end of a plug with the latch down, pin 1 is on the left.
Hint: Engrave "1" over pin one of the sockets on your tester and the opening on your crimping tool. Also draw your preferred color sequence on a sticker and put it in handy places like the back of the tester.
T568B is identical to T568A except that pairs 2 (orange) and 3 (green) are swapped. Thus the order is: orange/white, orange, green/white, blue, blue/white, green, brown/white, brown. This is very common, and interoperates fine with T568A (as long as each cable is consistent in itself!). To avoid confusion, avoid mixing A and B in a single location.
When two computers communicate, you need the wire from each computer's "transmit" pin to go to the other's "receive" pin: thus the wires must cross over. Otherwise it would be like talking into someone's mouth and listening to their ear. Even so, CAT5 wires do not cross over: the same wires go to the same pin numbers at all connectors. This works because hubs all have built-in crossovers.
Using a normal cable to connect two computers together directly (instead of via a hub) involves no crossover, and so it doesn't work. Connecting one hub (or DSL router, etc) to another would involve 2 crossovers, which is equivalent to no crossovers and also won't work. So these connections need a special "crossover cable".
Some hubs and routers have a special "uplink" port -- this is simply a port without a crossover. Thus, running a regular (non-crossover) cable from that port to a normal (non-uplink) port on another hub, ends up with exactly one crossover (at the other hub), and works fine. A crossover cable would not work there, because it would add a second crossover, effectively undoing the first one.
Crossover cables swap pairs 2 and 3 (not the wires within each pair). For CAT5, pairs 1 and 4 go straight through (they're unused anyway). This amounts to one end being wired as T568A and the other as T568B; there's probably some interesting history to that. So a CAT5 crossover cable looks like this:
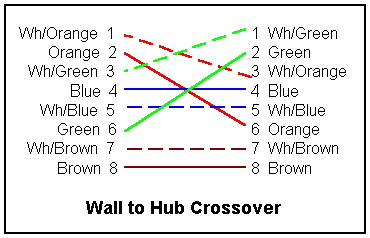
If (I should say "when") you make one of these, mark it so clearly that you'll never confuse it. I recommend making all crossover cables, and only those, bright red, for example with some red paint or vinyl tape at each end.
For CAT6 you have to swap pairs 1 and 4 also, because CAT6 does use all 8 wires (I imagine CAT6 probably sends 2 bits at a time on separate wires, to double the bit-rate).
If you go on the road with a laptop, you'll want a crossover cable along for impromptu 2-machine networking (see my Road Warrior Guide for more on this). But instead of carrying two whole cables, make a short "crossover extension cord": put a little wire from a socket to a plug, wired in crossover fashion. You can use this to convert a regular Ethernet cable into a crossover (you do have a long regular Ethernet cable in your laptop bag, don't you?). Or better, just buy a Mac and it will automatically detect when a crossover is needed, and do the right thing even if you use the wrong cable.
 Altex sells a simple crossover convertor for only $2.95 -- it's the only one I've found that goes male to female; the rest are all female to female, which means you'd have to have another patch cable to get back to male anyway.
At this point I'll do like Herodotus and slightly break my promise about content, to tell you that for a 2-computer network you should just manually set a distinct IP address for each machine (that is, don't use DHCP or "automatic"). Each machine can address the other by that numeric address. Addresses starting 192.168 are reserved for private local nets, and a typical pair of IP addresses to assign would be 192.168.1.1 and 192.168.1.2, with a "subnet mask" of 255.255.255.0. Do not use addresses with the 4th (last) component zero.
If you use a punchdown block or patch panel, the convention is to punch down the pairs in numeric order. In each pair the striped wire precedes the colored wire. Thus white/blue, blue, white/orange, orange, white/green, green, white/brown, brown (or "BLOG" for short: BLue, Orange, Green (brown is the one left over). For patch cables from a panel to a hub, you may want to buy an assortment of colors so it's easier to see which cable goes where.
If you need to run a connection outdoors or (especially) underground, you should probably use specially-rated cable. Altex has a "direct burial" cable here. It's may also be wise to put the cable inside of some kind of conduit rather than burying it directly. This will save a lot of time later, when (not "if") you want to add more wires or replace a broken cable. Same thing for going up an outside wall to get between different floors.
When using conduit, remember 2 key rules: First, never have more than 180 degrees of bends in conduit without an access point (like a "pull elbow"), or you'll have a very hard time pulling wire through at all. Second, use conduit one size larger than you thought at first; the conduit should never be more than 40% full.
If you want to go beyond the 100 meter/325 foot length limit for twisted-pair cable, you have several options; all of them cost more, but some aren't too bad:
Many hubs and routers have one coax connecter in addition to all their twisted-pair sockets, so if you get those for each end, that's about all there is to worry about. However, inexpensive ones meant for home use usually don't have the coax connecter. In that case, you need a "media converter", for example the NetStream CEM0100, or the Transition Networks Ethernet to AUI Media Converter, for about $60-80. It's not enough to just convert the kind of plug.
Finally, you can extend the range of a wireless network. Some wireless devices claim much higher range, such as the "D-Link Wireless Air Xpert G Access Point" or DWL-2100AP here, that claims to have an outdoor range of up to 1312 feet. In general, the newer Wifi types have greater range (as well as much higher data rate).
You can greatly increase WiFi range with a better antenna. If you put a dish antenna at each end and point them exactly at each other, you're focusing all the energy in one direction, instead of spreading it everywhere; typical WiFi cards have been pushed to 10 miles that way -- see this example. Abandoned or surplus satellite TV dishes work great. You do need clear line-of-sight, so you might have to mount them on your roofs, trim some trees, or something. You also need WiFi base stations that have external antenna connections. For example, the Apple Airport Extreme base station; the Proxim Orinoco Gold 8470-FC PCM card; and the Senao Engenius ECB-3220 Wifi Access Point (which can run on "power over ethernet" mentioned above).
It's tempting to use the extra pairs in a CAT5 (or even CAT3) wire for phone lines. This violates the CAT5 rules, which reserve the remaining 4 wires (they are used if you upgrade to CAT6). A ringing phone line also has 50-90 volts, which seems like it could cause problems when that close to the Ethernet wires. However, several people have written to report success sharing wires this way, and none have reported actual problems. So I conclude that this is seldom a problem in practice.
Warning: When the phone rings, the voltage generates an electromagnetic field, which in turn generates voltage in the adjacent Ethernet wires. Since Ethernet runs at about 2-5 volts rather than this 50-90 volts, conceivably an Ethernet card or hub could be burned out ($$). My guess, though, is that recent Ethernet cards include surge protection that is good enough to handle ringer-induced interference as well. If you're worried, avoid this kind of wiring or add surge protection (such as the Leviton 5952 or the cheaper APC ProtectNet).
 Since the blue pair is for the primary phone line in standard phone wiring, it makes sense to use it that way here too. When attaching wires to sockets, just remove more of the outer shielding, and bend the blue pair over to connect to the center two pins of an RJ-11 phone socket, as shown to the right. If you're doing this with CAT5 or better wire, you'll still have the brown pair left over. You can run it to a second phone jack for a second line, or to the next pair out (pins 2 and 5) of the first phone socket, which I believe is what 2-line phones expect (check their instructions to be sure).
Older phone wiring often has 4 wires, though an RJ11 jack can hold six and a single phone line needs only 2. Red and green are pair 1, the center 2 pins. Yellow and black are pair 2, the next pins out. The usual mapping to new wire colors uses pairs 1 and 2 likewise. This means than they go on the same pins if you use T568B (which may account for that being so common):
   Red      Blue
   Green    White/blue

   Yellow   Orange
   Black    White/orange
If you have a lot of phone connections in your house, you are best off running them in a "star" or "home run", that is, all running back to one central point. This is not necessary for phone wiring, but it does mean that
At the central point, for phone wires I greatly prefer using a punch-down block. The problem is that standard blocks are meant to connect a many-wired outgoing cable, to 25 independent phone lines. What you want is to connect a whole bunch of phones to the same 1 (or maybe 2) phone lines. For that you either need an awful lot of jumper wires on a standard block (painful), or a special block. Leviton makes a nice block they call a "Bridged Telephone Distribution module", available for example from SmartHomeUSA. It's just a little circuit card with 10 rows of punch-down connectors like on the back of an Ethernet socket. You punch each phone outlet's wires down into one row, and you're done. I think it's overpriced at about $25-30, but it will save you a lot of work so it's probably worth it. If you have more than 9 phone outlets (one row is for the incoming line) just get 2 such panels. You can put them side-by-side or in completely separate locations (like one in basement and one in attic). You don't need any special panel to mount it to -- just screw it to the wall, using a few washers to keep it from actually touching the wall. This is important even if the wall doesn't seem conductive -- like drywall. A friend discovered his panel shorting out after a few months when he didn't insulate it from the drywall behind it.
I was once right at the length limit for DSL, so I had to learn a few tricks. For example, the provider's measurement of your distance out will likely be about 2000 feet too high -- merely plugging in the DSL modem may knock 2000 feet off the measurement (thus perhaps bringing you in range). Also, every splice in the line degrades the line -- especially things like wire nuts. It may help to install the DSL modem right where the line enters the house (in which case, be sure you've run a CAT5 or better line from there to your hub). My line was unreliable until they came in and removed 2 gratuitous splices.
Another common problem is "bridge taps" -- places where the wire forks. For example, the phone company may have a 100-pair cable coming down the street, and then fork the whole thing onto two side streets. This is flexible: all 30 houses on one side street can have two lines each if the other side street doesn't want any; or vice versa; or anywhere in between. Removing any bridge taps on your line will make a huge difference in DSL signal quality. Bridge taps can be detected and located to within a few feet, using standard high-end test equipment.
Typical DSL and cable modems connect to the carrier on one side, and have a standard Ethernet connector on the other. Probably the Ethernet is going to be 10 Megabit, since that's still way faster than DSL or cable speeds. You also see a standard Ethernet connector if you're lucky enough to have Verizon's "FIOS" fiber-optic service, but it should support 100MBps because they'll let you buy up to 30Mbps (even though very few Web servers out in the world will hand you more than 2Mbps!). The modem or nid is essentially a hub, with translation from Ethernet to DSL/cable/fiber built in. Once the modem is in, you should merely have to plug a crossover cable from it to your hub, and then have the fun of configuring (my FIOS installers were very happy when they asked where to run an Ethernet cable, and I told them to just plug in to the socket next to where they brought the cable in). You can put printers and other devices on your internal net. But if you want more than one machine to have Internet access, you may need to do something special:
If your provider uses fixed IP addresses, you can get an address for each machine from your provider (probably at extra cost).
If your provider uses dynamically-assigned addresses ("DHCP"), you may be able to just plug in extra devices and they'll work. Or the provider may catch it and either refuse them, or quietly start charging you extra, or something.
Or, you can get a small router that you hook up as if it were a full-fledged machine. It takes the one IP address you have, and forwards messages back and forth between your other machines and the net. It will probably support DHCP on your side, so any machine you plug into your net gets assigned an IP address automatically (routers won't generally pass them through, so your internal traffic shouldn't be visible to your provider or neighbors). The router then uses "IP masquerading" or "Network Address Translation" to rewrite requests from your machines and forward them onto the Internet as if they were its own (and of course to forward the replies back the other way). Some DSL modems have such a router built in.
I use the Linksys Group Broadband EtherFast Cable DSL Router. It goes for well under $100, and includes a good firewall and a 4-port 10/100Mbps Ethernet hub. This has proved to be a really good investment. Linksys makes a similar device that also includes a wireless base station (for slightly more $). I've also heard good reports on an "SMC Broadband router", which also includes modem and printer ports (the latter may save you from spending a lot more to get an Ethernet-equipped printer).
Once you're connected, you're connected. Your machine is truly on the net, which is great since you get fast response and no setup time. It is also dangerous. A bug in any program you run (knowingly or not) that talks to the net, can expose your entire system to hacking. This is itself a good reason to put in a DHCP router as just described, and to have good virus protection, kept up-to-date. Both provide considerable extra protection.
Even with a firewall/router to maintain security, you may be giving up some privacy. Your machine sends your IP address to every server you talk to, because the server has to use the address to send anything (like a Web page!) back to you. If you have a fixed-IP-address, it is trivial to trace it to you, unlike a modem connection where your IP address is different on every call, and can only be traced if logs are kept by the ISP. There are technologies to increase privacy (such as Avi Rubin's Crowds system); consider using them.
But God, or kindly nature, ended their contention -- driving land from sky and sea from lan. Material air beneath the heavens' ether did sink. Thus distributed each took its proper place; He nets the fractious parts in tranquil peace.Ovid, Metamorphoses 1.21
Here are some additional relevant sites (I had several others, but the links to them have broken -- sic transit gloria web):
Back to home page of Steve DeRose, or The Bible Technologies Group. Or, contact me via email (fix the punctuation).